Engraving Fact Sheets
Return to Fact Sheets Main


Download a .pdf file of this Fact Sheet


Surface Engraving (Including Burnishing and Diamond Drag)

Section One - Burnishing

Description
Burnishing is a surface marking technique intended for coated metals - usually lacquered brass - where the coating is removed to expose the bare metal. It is a method of rotary engraving on metals that tends to bridge the gap between diamond drag (scratch engraving) and routing. The biggest advantage of burnishing is that it enables the engraver to produce wider line widths than are obtainable with a diamond graver without having to cut deeply into the metal. Burnishers can be used with single and multiple line fonts, and are excellent for producing detailed line and logo work on metal. Burnishing offers the ability to create enhanced effects on both lettering and graphics and is relatively simple process.

Content on this page requires a newer version of Adobe Flash Player.

Get Adobe Flash player

Application
The most common application is on the brass plates on trophies and plaques. This “trophy brass” is a relatively hard material that yields excellent burnishing results. It is available in various gold tones with clear or colored lacquer coatings. When burnishing the gold material, the lacquer is removed exposing the bare metal. The burnished areas can then be oxidized or blackened resulting in a gold plate with contrasting black letters. (See “Color Filling Fact Sheet”). When burnishing the colored materials, the result is a colored plate with contrasting gold letters without the need for further treatment.

Burnishing can also be done on materials other than brass. However, much of the success or failure depends on the hardness of the material. Since burnishing is a surface marking technique, it is critical that the tip of the burnishing tool does not penetrate the surface of the material by an appreciable amount. Hard materials tend to prevent deep penetration of the burnisher forcing the tool to work on the surface as it was designed. However, on softer materials the tool is able to penetrate deeper and can produce ragged edges and unacceptable results. Many of the colored aluminum products on the market fall into this category and are not ideal choices for burnishing although some can be burnished effectively using a diamond burnisher. There are also harder aluminum products available with clear or black anodize treatments that can be effectively burnished.

It is also possible to burnish metals such as steel and stainless steel. Since the burnishing tool produces a swirled pattern, the mark is visible and may be suitable for some marking applications not requiring a sharp, well defined character. Generally speaking, however, these metals do not have coatings and therefore, the burnishing can not be blackened to add contrast.

Burnishing Tools
The tool used for burnishing is called a “burnisher” which is a rotating tool that is used in a motorized spindle. It is usually a carbide or carbide-tipped tool that is ground with four facets. Two of the facets form an angled chisel edge on the center of the tool. The other two facets are ground perpendicular to the chisel edge, equidistant from the center of the tool and determine the width of the tip. Antares carbide burnishers are available in widths from .005” up to the full diameter of the tool in increments of .005” (.005”, .010”, .015”, etc.).

Content on this page requires a newer version of Adobe Flash Player.

Get Adobe Flash player

Carbide
Burnisher
Burnishers can also be made as diamond-tipped tools (diamond burnishers or rotating diamonds) similar to those used in glass engraving. These tools produce a more brilliant effect and have a longer life, but are considerably more expensive. Diamond burnishers are standardly available in tip sizes of .005”, .010”, .015”, .020” and .030”. Larger sizes are available as special orders.

Content on this page requires a newer version of Adobe Flash Player.

Get Adobe Flash player

Diamond
Burnisher

When selecting a tip size, follow the same guidelines that are used for standard engraving cutters. For example, if you were to use a .030” cutter when engraving plastic, you would use a .030” burnisher when burnishing a brass plate with the same font and letter size. Since burnishing is generally done with small, multiple-line fonts, the most common tip sizes are between .005” and .030”.

Burnishers are quite durable and are capable of producing thousands of characters. Like cutters, they do become dull, however, and require periodic resharpening. As a burnisher dulls, the chisel edge becomes rounded. This produces rough edges and if allowed to continue, will result in the surface coating being smeared in to the burnished stroke and can hamper oxidizing.


Process
Since the purpose of burnishing is to remove the coating from the surface a the material, the key to achieving successful results lies in the amount of downward pressure that is exerted on the tool. A burnishing tool is not a cutter and if too much pressure is applied, the tool will be forced into the material resulting in a rough, ragged stroke. Ideally, the tip of the tool should “float” over the surface with only enough pressure to remove the coating without digging into the metal.

To set the machine for burnishing, remove the depth nose and lower the spindle to its down position. Next, screw the knob into the spindle, slide the burnisher down through the knob until the tip contacts the plate and then tighten the set screw in the knob. Raise the spindle and then increase the “depth” a few thousandths of an inch by either adjusting the down stop on the spindle or sliding the burnisher further through the knob. Since the bases and tables of all machines are not perfectly level and material thickness can vary, it is important to set the tool at the lowest point on the plate. This will ensure that the tip of the tool will remain in contact with the entire surface of the plate.

On computerized machines where the Z-axis (up and down) is controlled by air and spring pressure, both should be set to their lowest setting. The motor speed should be relatively fast and the engraving speed should be at about the middle of its range. A slower engraving speed will produce a smoother finish in the burnished stroke.

The set-up procedure is identical for both pantographs and computerized engraving machines, however on a pantograph the correct pressure is determined by the “touch” of the operator. It is a technique that is easy to develop and the results should be equally as good as those achieved on a computer. One trick that some pantograph operators use is to remove the spindle return spring. This allows the spindle to drop on its own and float over the material. The weight of the spindle alone is sufficient to produce the desired results, but you must remember to lift the spindle when moving from character to character.

One way to simplify the burnishing process and achieve consistent results is through the use of a spring loaded burnishing attachment. These devices are used in place of the conventional knob and have an internal spring that applies the correct amount of pressure. These attachments usually require a burnisher that is longer than normal, so be sure to specify that you are using one of these attachments when ordering to ensure you get the proper length tool.


Example of burnishing. Shows single line font and fill font.


Section 2 - Diamond Drag

Description & Application
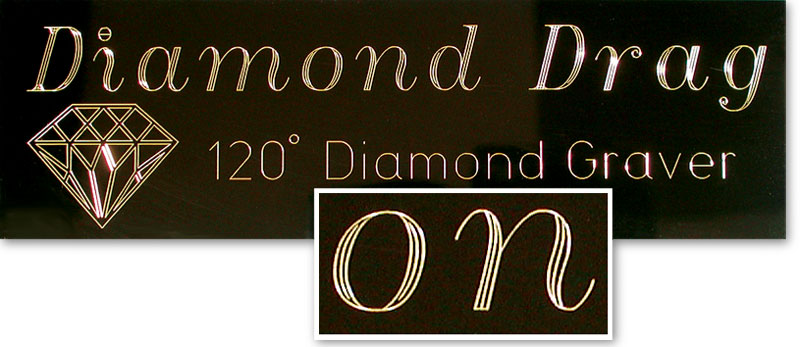
The most common form of engraving in the trophy and awards industry is done using a non-rotating diamond-tipped tool to scratch lettering or designs in metal.


The process is frequently referred to as “diamond engraving,” “scratch engraving,” or “diamond drag” with the latter probably being the preferred terminology.

Diamond drag engraving can be performed on virtually all metals and in some applications, glass and plastics. In the awards industry, it is typically used as a quick, easy, and inexpensive method of engraving the pre-finished brass and aluminum plates on trophies and plaques. On colored plates, the diamond penetrates the coating and exposes the bare metal; a gold color on the brass and silver on the aluminum. On material that has a clear coating, the engraving can be blackened with an oxidizing solution to add contrast. (See our “Color Filling Fact Sheet”)


Diamond Gravers
The tool that is used in the diamond drag operation is referred to as a “diamond graver.” It consists of a steel shank that has a diamond set in one end. The diamond is ground to a conical point and then “lapped” to create a smooth, polished surface. This is an important step in the manufacturing process as the brilliance of the finished cut is largely determined by the finish on the diamond.

General-purpose diamond gravers have an included angle of 120°, 130°, or 140°. In addition to the standard tools, Antares also offers specialty gravers with included angles of 90° and 100° which can be used for delicate engraving on epoxy coated pens. These tools are considerably more fragile than the standard ones and are not intended for use on metal.

Antares diamond engravers are available for all popular engraving machines. The most common is the “diamond insert” which measures 1/8” × 1-1/8” and has a flat on the shank. It is inserted into the bottom of a non-rotating “diamond spindle” and is held in place by a set screw tightened against the flat.

Top-loading diamond gravers (those that are inserted into the top of the spindle and held in place by a cutter knob) are available in 1/8”, 11/64”, 1/4”, 4 mm, and 6 mm shank sizes. While these tools are used in rotary spindles, the engraving operation is performed without the motor running. Using the diamond graver as a rotating tool can shorten its life and can damage it beyond repair.

A diamond graver is very durable and will last a long time, but like any cutting tool, it becomes dull and less effective after use. As the diamond wears, the point becomes rounded and instead of slicing through the metal cleanly, it has a tendency to tear it and produce rough, uneven cuts. Another problem caused by a worn diamond is that the blunt point can smear the surface coating into the cut. On colored plates, the result is an uneven, blotchy appearance. On plates with a clear coating, the visual effect is minimal, but oxidizing may be a problem. The oxidizer blackens the bare metal, but not the areas where the lacquer has been pushed into the cut

Diamond gravers can be relapped (resharpened) to restore the point to its original condition. Due to the minimal cost difference between relapping and a new tool, we do not recommend relapping 1/8” gravers, however it is cost-effective for the 11/64”, 1/4”, 4 mm, and 6 mm tools. A dull diamond offers more resistance to the metal and is subject to more pressure. Continued use can fracture the diamond or tear it from its setting.


Procedure
The diamond drag operation is a simple one. As downward spindle pressure is applied, the point of the diamond penetrates the surface of the material and then scribes a groove as the spindle moves laterally to form a character. In this type of engraving, there are no width or depth options. To a limited extent, both of these aspects are a function of the amount of pressure applied, the sharpness of the diamond, and the number of passes made. Generally, the width of the stroke winds up being about ten thousandths of an inch (.010”). There are no “special” non-rotating gravers capable of producing strokes of specified widths. If broader strokes are required, burnishing would be a good alternative. (See Burnishing)

As a diamond graver moves through the material, there is a considerable amount of sideward pressure exerted on the tool. Therefore, the best situation is to use a diamond insert in the stationary diamond spindle as it is rigid and provides support. When a graver is used in a rotary spindle, the sideward pressure pushes against the spindle and can ultimately cause damage to the lower spindle bearings.

The overall appearance of the engraving can vary greatly depending on the metal, the font, and the technique used. On trophy brass, which is a relatively hard material, the line will be crisp and defined. Lacquered aluminum is softer and tends to yield a cut that is rougher and not as uniform. One way to improve the engraving quality on softer materials is to use less pressure.

Very hard metals such as stainless steel and hardened steel will produce a crisp, but fine line. Depending on the hardness, the stroke can be broadened and deepened by engraving the letters two or three times. The use of multiple-line fonts is also a good way to achieve the appearance of a bolder character in all materials.

It is also possible to engrave glass and some plastics using the diamond drag technique. Scales and grids that have extremely fine lines can be produced on glass or acrylic lenses. The basic techniques are the same as for metals, but the pressure becomes a critical factor in maintaining uniform line width and needs to be precisely controlled to assure optimal results. Use of a spring-loaded burnishing adapter can help in maintaining a constant controlled pressure.

Example of diamond drag. Shows single line font and multi line font.